If you have 2 or more Cloud Fabrics in the same Cloud Provider you can now (from cAPIC 5.2) use the Cloud Providers backbone for interconnecting these Data Centers (DCI). Prior to this you needed to build IPSec tunnels over the Internet between the sites to achieve this. This gives you the benefit of high bandwidth and predictable latency between Cloud Sites belonging to same Cloud Provider.
This is achieved in AWS by VPC Peering and in Azure by vNET peering. You can still use VGW (in AWS) and VNG (in Azure) over the Internet if you wished to do so. However keep in mind that VGW/VNG is expensive and it gives you less bandwidth and unpredictable latency since it goes over the Public Internet.

Please note that this high speed connectivity option is only available when both sites are in the same Cloud Provider. A fabric from one cloud provider to another cloud provider will still need to use ipSEC tunnels over VGW/VNG. Fabric from Cloud Provider to On-Premise ACI Fabric can be done via ipSEC over VGW/VNG (Public Internet), or over Direct Connect (AWS), or Express Route (Azure). The figure below shows connectivity options between different Sites.

The initial setup parameters for cloud APIC Inter-site connectivity parameters have now been moved to MSO. This gives you the benefit of having more granular InterSite connectivity options and also prevents you from making mistakes like assigning duplicate or overlapping subnets for Inter Site Connectivity. You will need MSO release 3.3x or above which runs on Nexus Dashboard 2.2 and above Platform. ND is available to run on-site as OVA or in cloud Provider sites. A fully managed SAAS version of ND will be available in the near future.
Before we start, let’s sidetrack a bit and refresh our memory on Cloud Objects to ACI Objects


In this article, I will show the differences in setup for using this new enhanced High Speed connectivity between sites of the same cloud provider. You can follow through this and use this as a Proof Of Concept to familiarize yourself with this feature. I will not show you how to deploy Cloud ACI Fabric from scratch here since I’ve already discussed that in great detail for both AWS and Azure in previous writeups.
AWS cAPIC Install AWS TGW Setup
Azure cAPIC Install Azure cAPIC Install differences in 5.0.2
cAPIC 5.2 requires CSR 17.3.2 Bring Your Own License agreement to be acknowledged for ACI fabric in Azure. For AWS you don’t have to acknowledge anything as this is automatic.

When going through the First Time Setup for cAPIC you will now notice some differences. For Azure, you will not see any option for Inter-Site Connectivity since all such options have now moved to MSO. Remember for a Multi-Site ACI Fabric MSO is mandatory, so it makes more sense to have those options in MSO itself.

Similarly for ACI/AWS fabric there is no option in cAPIC for Inter-Site Connectivity. Configuring TGW parameters is still there. Remember TGW in AWS is used for TGW peers from Tenant VPC to Infra VPC and has nothing to do with Inter-Site Connectivity. In 5.2 release TGW deployment has also been enhanced making use of TGW Connect attachment. We will discuss that in a future writeup.
You will also notice that the option for putting in on-Premise parameters for CSR IPs is now no longer present in cAPIC for both AWS and Azure. Those options have moved to MSO.

I also want to point out that you will now see a new option in cAPIC 5.2 to view the CSR releases

It is important to note that in Release 5.2 for Azure, the cAPIC fabrics (ACI fabrics) for the sites need to be under the same Azure Active Directory. Cloud Backbone connectivity across ADs will come in a future release. Please make sure to configure IAM roles (Managed Identity). The roles should give both subscriptions (under same Azure Directory), Contributor and Network Contributor roles. Technically, Network Contributor is a subset of Contributor role, so Network Contributor is not needed, but I generally have the habit of doing this to be on the safe side.

For AWS, this should work without having to define explicit roles in AWS.
Once the Initial setup on cAPIC is completed, you will have to go to MSO and add in the sites. You will need MSO release 3.3x or above which runs on Nexus Dashboard 2.2 and above Platform. ND is available to run on-site as OVA or in cloud Provider sites. A fully managed SAAS version of ND will be available in the near future.
It is a good idea to go to the ND dashboard and add a static host route for your cAPICs

Now it’s time to add in the Sites from ND

In my POC case, I’m adding 4 sites from ND (MSO currently can have 12 sites). I have brought up 2 Sites in AWS and 2 in Azure.
Note: Please ignore the Major Alarms/Faults. They are because I have not bothered to license cAPIC and CSRs for this POC.

Next go to MSO and turn on Managed for all your sites as shown below.

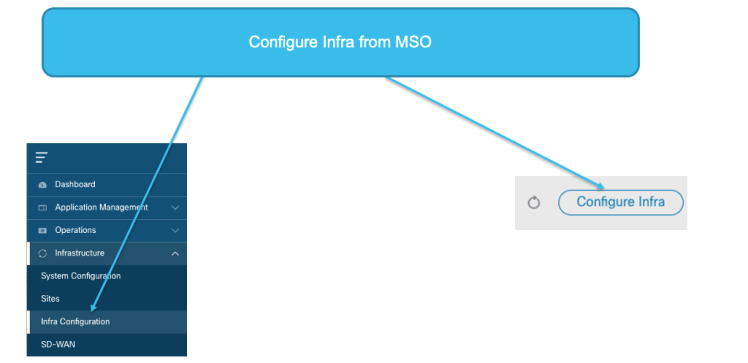
Now from MSO, go to Configure Infra
In General Settings, put in the OSPF area and External IPs. Remember this is Global Option. All Fabrics in this MSO will use this as needed.

If you had physical sites, you would Click on IPN Devices and put in the information related to the On-Site CSRs

Now Turn on Multisite for the Fabrics


Now go to your Underlay configuration for a site to add in the connectivity for Backbone (vpc/vNET Peering) or ipSEC. Below I show from Azure Site1 configuration of MSO

Here I add in Cloud Backbone Configuration for Azure Site 2

Repeat the same steps for AWS. From AWS Site 1 add in AWS site 2 for Cloud Backbone. The reverse side of the configuration will automatically be done for you, i.e. you don’t have to go to Azure Site 2 to add in Azure Site1 as Cloud Backbone. Neither do you have to go to AWS Site 2 to add in AWS Site1 as Cloud Backbone.
At this point you have finished configuring Cloud Backbone for sites in the same provider.
AWS Site1 <–> AWS Site2
Azure Site1 <–> Azure Site2
However you still have not configured connectivity between Azure and AWS sites. Since those Sites are in different Cloud Providers, you cannot configure Cloud Backbone between AWS and Azure. So, we would need to configure ipSEC for that connectivity.
For that, go to one of the sites, for example AWS Site 1 and add in the 2 Azure Sites for ipSEC connectivity as shown below. I’ve also chosen to use IKE Version 2 for this. The reverse sides of the ipSEC connectivity will be done for you automatically, i.e. ipSEC from Azure Site1 to AWS Site1 and ipSEC from Azure Site2 to AWS Site1.

Repeat the same step from AWS site 2 and add in Azure Site 1 and Azure Site2 for ipSEC connectivity. Again the reverse ipSEC connectivity will be done for you automatically, i.e. ipSEC from Azure Site1 to AWS Site2and ipSEC from Azure Site2 to AWS Site2.
Now, go ahead and deploy the configuration as shown below. Since I don’t have any on-Premise CSRs in this POC, I don’t need to download IPN configuration for on-Premise

Once the above configuration is done, our Multisite Data Center Fabric is ready for use. There are 4 Sites in this example that we configured. The 2 AWS sites have VPC peering over AWS Internal network and the 2 Azure Sites have vNET peering over Azure network. Between Azure and AWS the connectivity is through ipSEC tunnels. From each site CSR you should expect 6 BGP peers one to each CSR of the other Sites

Looking at one of the CSRs you can verify that we have 6 BGP neighbors. In this case, I’m looking at a CSR from Azure Site.

In Release 5.2 the 4 CSR Gig interfaces are used as shown below:

Notice also, how Tunnel Interfaces ae assigned IPs from the General Settings External Subnet Pool that we defined earlier from MSO

You could also go to the Azure UI and check to verify that vNET Peering between the 2 Infra Overlay-1 vNETS in the 2 subscriptions are established.

Similarly, you can also verify from AWS console that the VPC peerings between the 2 overlay-1 VPCs in the 2 AWS accounts have been established

Conclusion: cAPIC 5.2 gives you the ability to peer between the same provider cloud sites through the Cloud Providers High Speed Internal Network. This gives you high bandwidth and predictable latency as the peering between the sites don’t have to go through ipSEC over the Internet.