If you already have resources deployed in Azure, you can now connect your brownfield vNETS to the Azure cAPIC vNETs using vNET Peering. This means your connectivity from ACI Fabric vNETS to the brownfield vNETS can go over Azure’s backbone directly. Security Policies can be attached for this connectivity based on requirements.
You can follow this guide and which will guide you step by step on the steps involved to Integrate ACI Brownfield on Azure to the ACI Fabric Tenant. For this Proof Of Concept lab, please use a Azure subscription where you have cAPIC 5.2 already installed. If you need to install cAPIC 5.2 ACI fabric, please see the previous article Cloud ACI 5.2: Interconnecting ACI Fabrics Over Cloud Provider’s Backbone at High Speed for both AWS and Azure
For this lab, we will first spin up a simple brownfield environment in the same Azure subscription that has your Azure ACI Fabric. Instead of doing this by hand, we will use Terraform to quickly spin up a brownfield environment in Azure.
Note: The terraform script that you will download and install was written by me for a bootcamp I conducted for Cloud ACI. This will create Azure Resource Group, vNets, spin up a Ubuntu VM, install docker and spin up a Radius container. In this lab we will not use the Radius Server, but rather just double up on the brownfield environment.

If you already have Terraform installed and the environment setup, you can just download the Terraform script and start from there. If not, the below will guide you through doing this quickly (few minutes).
The first thing you will need to do is create the proper environment parameters so Terraform can authenticate to your Azure subscription. For this you will need to create a Service Principal with contributor role to the azure subscription. Let’s do this quickly using azure cli on your local MAC or Ubuntu machine.
If you don't have Azure CLI installed, you can do this with the commands shown below:
mac: brew update && brew install azure-cli
ubuntu: curl -sL https://aka.ms/InstallAzureCLIDeb | sudo bash
- Now login to your azure account using Azure CLI:
az login
Your default web browser will open up and you can authenticate from the browser

- Now, choose the correct subscription where your cAPIC is installed:
az account set -s <subscription_ID> #Make sure to choose one of the subscriptions where you installed cAPIC 5.2 -
Verify that you have selected the correct subscription:
az account show

- Now create your Azure Service Principal and give it Contributor role to the subscription:
az ad sp create-for-rbac --name terraformSP --role Contributor

- Use the output of the Service Principal creation command to populate the fields below. I suggest copying the below to a text file and filling in the parameters:
cat > sourceMeTF << EOF#!/bin/bash# Please populate and then source this fileexport ARM_CLIENT_ID=<The AppId you got>export ARM_CLIENT_SECRET=<password you got>export ARM_TENANT_ID=<Your Tenant Id>export ARM_SUBSCRIPTION_ID=<Your Subscription ID> # az account show to get thisEOF
As an example, my modified text file looks like below which I copied and pasted to my local terminal:

- Source the file to set the Terraform environments:
source ./sourceMeTF

- Install Terraform on your MAC or Ubuntu box. For this just go to https://www.terraform.io/downloads.html and copy the appropriate link and curl or wget the zipped code.

- On your local MAC or Ubuntu, create a temporary directory and use curl or wget to get the code using the copied link:
curl -O <the copied link>

- Unzip the zipped code and then move it to /usr/local/bin:
unzip terraform_0.14.9_darwin_amd64.zipsudo mv terraform /usr/local/bin

- Now verify the terraform version:
terraform --version

Now you are done with installing Terraform and creating the correct environment for the Azure Subscription. All you have to do now is download the script from my git repo and run it to create the brownfield environment in that Azure subscription. First create a directory where you will download and run the script from:cd .. ; mkdir myTF && cd myTF

Now, clone the terraform script and run the script:
git clone https://github.com/soumukhe/azurerm-vmmain.gitcd azurerm-vmmainterraform initterraform apply -auto-approve

Note: When you are all done with the lab, you can delete the brownfield with the “terraform destroy” command.
ssh into the Ubuntu Instance spun up on your Azure environment to verify that it’s up and running:ssh -i sshPrivKeyName azureuser@<VM_PUBLIC_IP>

Your brownfield environment is now spun up and a VM is running on it. Follow the below diagram from Azure UI to take a look at the evironment

There are a few Items that you need to keep in mind:
- These are the set of the things which cAPIC won’t do on these Unmanaged Resource Groups. It is the responsibility of the Unmanaged vNet owner to create all these policies and apply them.
- cAPIC will not create the Route Tables with the UDRs pointing to the Infra NLB based on the contracts with Greenfield EPGs.
- cAPIC will not create any NSGs and ASGs in these Unmanaged Resource Groups.
- There is no Endpoint discovery done for the endpoints in these Unmanaged Resource Groups
- In 5.2 release, tag-based EP selector is not supported for EPGs in these Unmanaged Resource Groups
- Unmanaged vNet can present anywhere, i.e in the same subscription or different subscription in the same AD or different AD all together. User should also have a service principal associated to this unmanaged subscription which has the read permissions on various resources.
- If an unmanaged vNet is present in a different subscription, then a new tenant has to be created.
- This new account created under the unmanaged tenant will also have a relation to read-only policy which will not trigger the creation of Event Collection/Stat Collection Resources on these subscriptions. Only the inventory pull will be done for these subscriptions.
- Once this is done, user need to create the Cloud Context Profile corresponding to the brownfield VNET.
Now that we understand the basics, let’s review the steps that are needed to complete the integration:
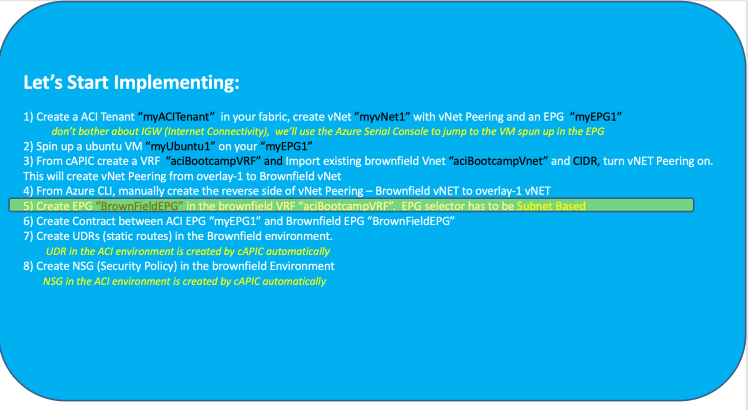
Summary of Steps at a Glance:
1) Create a ACI Tenant “myACITenant” in your fabric, create vNet ”myvNet1” with vNet Peering and an EPG “myEPG1”
don’t bother about IGW (Internet Connectivity), we’ll use the Azure Serial Console to jump to the VM spun up in the EPG
2) Spin up a ubuntu VM “myUbuntu1” on your “myEPG1”
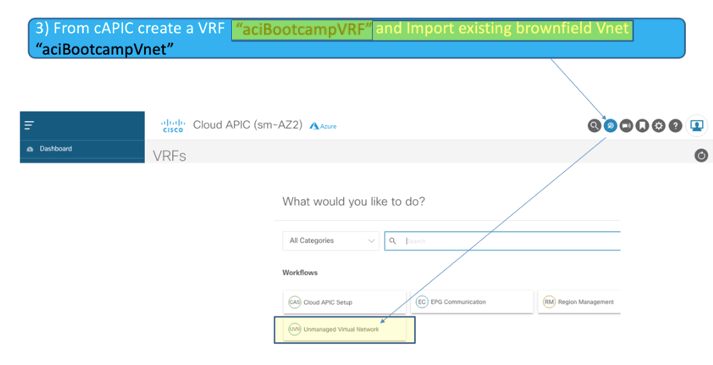
3) From cAPIC create a VRF “aciBootcampVRF” and Import existing brownfield Vnet “aciBootcampVnet” and CIDR, turn vNET Peering on. This will create vNet Peering from overlay-1 to Brownfield vNet
4) From Azure CLI, manually create the reverse side of vNet Peering – Brownfield vNET to overlay-1 vNET
5) Create EPG “BrownFieldEPG” in the brownfield VRF “aciBootcampVRF”. EPG selector has to be Subnet Based
6) Create Contract between ACI EPG “myEPG1” and Brownfield EPG “BrownFieldEPG”
7) Create UDRs (static routes) in the Brownfield environment
UDR in the ACI environment is created by cAPIC automatically
8) Create NSG (Security Policy) in the brownfield Environment
NSG in the ACI environment is created by cAPIC automatically


Conclusion: This writeup gives a demonstration on how to integrate an existing Azure brownfield environment to ACI / Azure Fabric Tenant