With the release of NDI 5.0, Cisco added the ability to integrate the NDI platform with other 3rd party monitoring applications. The first integration supported was AppDynamics. With AppDynamics you can feed in your application monitoring to the NDI dashboard to provide further information to aid in monitoring and troubleshooting specific issues with the application running within your Cisco ACI deployment.
This guide is written to help you deploy an On-Prem Appdynamics controller, configure a very simple sample application and guide you through the NDI integration process. In a later article, we will go over troubleshooting different alerts as well as the different agent types that are needed to populate .
AppD Architecture

Figure 1: Graphical representation of the AppD Architecture
AppD is broken into 4 different pieces. You have your enterprise console which is used to manage all your AppD Controllers. Then you have your AppD controller which is used to create the necessary agents that will communicate with your controller. The agents generated from the controller will only talk to that controller. Running alongside the controller is your Events Service which keeps track of all the data and anomalies that are captured from the agents. Finally, we have the AppD agents which run with our Apps or Servers. These agents report back to the controller about the performance of the app you are monitoring.
- Enterprise Console
- Appdynamics Controller
- Events Service
- Agent (DB, Machine, Network)
Integration Requirements
You will need 1 VM to run the AppD stack and 1 VM to host your test application, two VMs in total. Reachability is needed between both VMs to send the data between the nodes.
One AppD VM
- Enterprise Console
- Controller
- EUM – Event Server
One Application Server
- App Agent
AppD VM Setup
Installing AppD onto a VM is a very straightforward process. In this guide we are going to install our Enterprise Console and our AppD Controller onto the same host, this is not meant for an enterprise environment.
We start this process off by creating an appropriately sized VM for the task. I have used Ubuntu 16.04 as the base distro for the install, though any Linux distro is supported.
Next, we must create our VM to meet the following requirements depending on your planned deployment size. Since we are installing all 3 of the AppD components (Enterprise Console, Controller, Events on one system we must account for all their requirements. Meaning 50Gb + 50GB +10GB etc. I have a screenshot sharing my VM settings below.
ENTERPRISE CONSOLE
CPU Requirements
The Enterprise Console is not CPU intensive and therefore can manage multiple platforms with two Cores.
Memory Space Requirements
The Enterprise Console requires an additional memory of one GB of free RAM for Java and MySQL processes.
Disk Space Requirements
The Enterprise Console requires ten GB of free space to install. After the Enterprise Console installation, there must be at least one GB of additional space on the Enterprise Console host in order to perform any operations, such as installing a remote Controller.
 Figure 2: Screenshot of Supported OS
Appd Controller

Figure 3: Screenshot of AppD Controller Requirements
For our controller at least 50GB of disk space along with 2 cores and 8GB of RAM. This configuration is good for our EUM server as well.
AppD EUM Server
The requirements and guidelines for the EUM Server machine (basic usage) are as follows:
- Minimum 50 GB extra disk space.
- 64-bit Windows or Linux operating system
- Processing: 4 cores
- 10 Mbps network bandwidth
- Minimum 8 GB memory total (4 GB is defined as a max heap in JVM)
- NTP is enabled on both the EUM Server host and the Controller machine. The machine clocks need to be able to synchronize.
Here is my VM settings as an example:
 Figure 4: Screenshot of AppD VM settings
Because of how AppD on-prem licensing works it is a smart idea to configure a static MAC address for the VM so that it will never change. Your AppD On-Prem license is bound to the MAC address that you have supplied to them at the time of purchase.

Figure 5: Manually Configuring MAC Address in VMware
Do any necessary configuration to allow for package installation. This might include configuring a proxy for your package manager. Once configured go ahead and install the needed packages into the system.
sudo apt-get install libaio1
sudo apt-get install numactl
sudo apt-get install tzdata
sudo apt-get install libncurses5 # Use this even if your running Ubuntu 20.04
sudo apt-get install curl
Once these packages are installed, we can download the AppD Platform shell script to get our enterprise console installed. Login to your AppD account and navigate to the software download area. In the search bar search for “platform” and choose your desired installation version. In this example, we are using the latest at the time of writing this – 21.4. Be sure to set your filter to “Latest Version” before attempting to search for the platform shell script.

Figure 6: Downloading the latest version from AppDynamics Software Download
Notice that once you search for “platform” our filter selection has been cleared, but it is still active for our search.
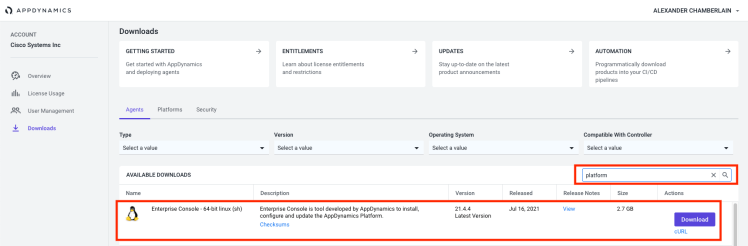
Figure 7: Filtering within AppD site is confusing to what is active
Click download and transfer the shell script into your VM or use the provided curl command to download directly into the system itself. If you are behind a proxy it is useful to use the curl command to quickly grab the file.
Installing AppD Enterprise Console
Once the platform install shell script is placed into the server, we can begin our installation procedure for the Enterprise console. This script makes it very easy to get the Enterprise console stood up as it contains all the needed Java files and libraries for the system to run. During the beginning of the install script, you will need to hit Enter multiple times as you are agreeing to AppD’s legal agreements.
First, we’ll need to change the file to executable.
chmod +x platform-setup-x64-linux-21.4.4.24619.shWe’ll enter ‘o’ to continue through the script. Then hit enter key until we see the 2nd screenshot below. There are soooo many places to hit the Enter Key.

Figure 8: Start of the platform install shell script

Figure 9: Agreeing to EULA

Figure 10: Agreeing to telemetry
NOTE: YOU WILL BE ASKED ABOUT USING HTTPS AND HTTP. You must choose as that will determine what URL you will use to access the controller and console. You will need to change the URL based on your choice here.
Next, we’ll decide where to install AppD.

Figure 11: Choosing AppD Enterprise Console directory
Now we’ll configure many database passwords. We’ll make all the passwords match and use the default ports for the install. Below is just a sample of the part of the input options.

Figure 12: Configuring default ports and User passwords
Once installed you will be greeted with the following output.

Figure 13: Finished Install output
We can now navigate to the mgmt. address of the AppD Enterprise Console.
http://<IP ADDRESS>:9191

Figure 14: Login prompt
Let’s log in with the password we configured earlier.
NOTE: IF YOU REBOOT YOUR APPD SERVER YOU WILL NEED TO RESTART YOUR ENTERPRISE CONSOLE AND CONTROLLER. YOU RESTART THE CONTROLLER VIA THE ENTERPRISE CONSOLE GUI. YOU CAN RESTART ENTERPRISE CONSOLE BY DOING THE FOLLOWING.
cd /home/cisco/appdynamics/platform/platform-admin/bin

./platform-admin.sh start-platform-admin
Installing AppD Controller and License File

Figure 15: AppD Enterprise Console Main Screen
Now we can proceed with the AppD Controller install. Go ahead and hit the Express install button.

Figure 16: AppD Enterprise Console Express Installation
We will use the same password as we configured for the Enterprise Console. After configuring the same password, we will wait for the install to complete. You can monitor the installation progress as well as view any logs from the Jobs sub-tab.

Figure 17: Monitoring the installation via the Jobs tab
Once completed your GUI should look like the following.

Figure 18: Successful installation of Controller and Events server
Now we can access the controller GUI at the following IP. Log in with your configured credentials. You will be greeted with the following home page.
http://<IP >:8090

Figure 19: AppDynamics Controller Homepage
YOU MUST DISABLE ANY BROWSER ADBLOCKING SOFTWARE. IT WILL INTERFERE WITH PAGES LOADING IN THE GUI.
We can now install our AppD license into the system. Go ahead and scp the license onto your host and place the license in the following directory.
/home/cisco/appdynamics/platform/product/controller/
Now use the touch command to start the license installation process. You can also wait 5 minutes for the automatic license scan to take effect.
touch /home/cisco/appdynamics/platform/product/controller/license.lic
You will know the license is active once you navigate to the AppD License webpage on the controller. Settings (Gear Icon in the top right) -> License. On this page you should see your active licenses.

Figure 20: Navigating to the license page via the Gear (Setting)

Figure 21: AppDynamics Controller Licence Page
Creating a test app and installing AppD Agent
Now let’s create a test application. This app will not have much data to show in the AppD GUI as it is very simple and lightweight. However, it is useful to test the connection between the App and AppD. We will be using the following PHP code for our test.
https://github.com/banago/simple-php-website.git
Go ahead and clone this repository into a separate machine that has connectivity to your AppD controller. We must ensure that on this App host we are using a supported PHP version and Apache version.

Figure 22: Supported PHP Version for 21.4
Install a supported PHP version using the following commands.
sudo apt-get install software-properties-common
sudo add-apt-repository ppa:ondrej/php
sudo apt-get update
sudo apt-get install -y php7.3
You can also just run the app using the following command. The & will run the app in the background. Note console output will be streamed to your terminal session but the app will continue to run the background.
php -S 10.201.35.243:8080&
We can navigate to the web server IP and port and are greeted with the following webpage.
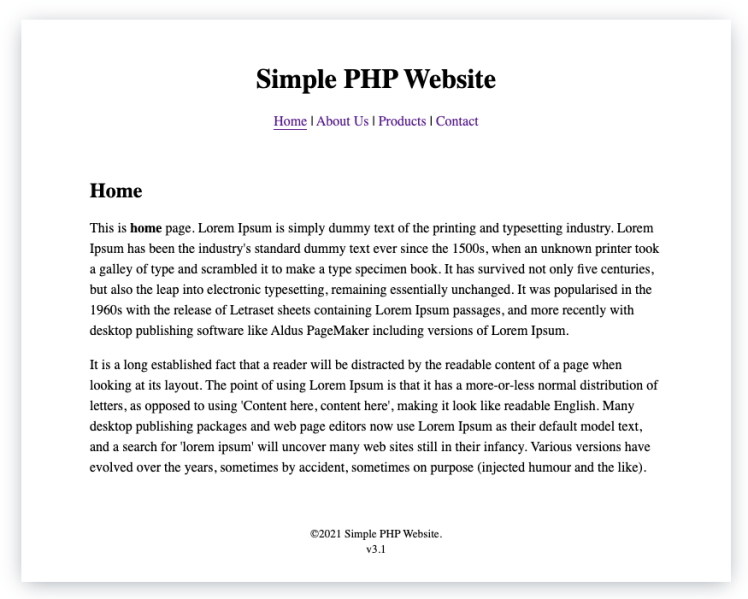
Figure 23: Screenshot of the Simple PHP Website hompage
Now let’s create an Application in the AppD controller and install our PHP agent. From the AppD controller Home screen, under applications click Get Started.

Figure 24: Select Getting Started
Navigate and select the PHP app button.

Figure 25: Selecting PHP from the Wizard choices
Choose the required variables for your app environment, I used a linux host but you could host this app on any OS. Provide an App name and App Tier.

Figure 26: Download the PHP Agent from the controller
Now we will download our PHP agent from the AppD controller and transfer the file to our App Web Server. Once the file has been transferred SSH to the web server and unzips the PHP agent. Change into the agent directory and install the agent using the provided command from the AppD controller GUI.
unzip appdynamics-php-agent-x64-linux-21.7.0.4560.zip
cd appdynamics-php-agent-linux_x64/
sudo bash runme.sh
The AppD GUI will show waiting on the connection from the agent which can take up to 5 minutes.

Figure 27: AppD waiting for data to be sent from the agent
Now let’s cancel and rerun our php command.
php -S 10.201.35.243:8080&
Once you have data being sent to the AppD Controller you should see the GUI change like the following. To generate data refresh your webpage and click around the website. Try to send some error codes as well, you can do this by trying to download a file that is not being hosted on the webserver.

Figure 28: Successful data collection from the agent
Once the data has been sent you will see the app appear under the Applications Tab.

Figure 29: Successful App agent connection in the Applications subtab
Connecting AppD to NDI
We can now connect our NDI app to our AppD Controller. Let’s navigate to our NDI App. Once in the App we will click the Gear Icon and navigate to integrations. Be sure to first select the appropriate Insights Group.

Figure 30: NDI GUI navigating to Settings -> Integrations -> Manage.
Click add Integrations on the next page.

Figure 31: Adding AppD Integration
Input the variables for your environment.
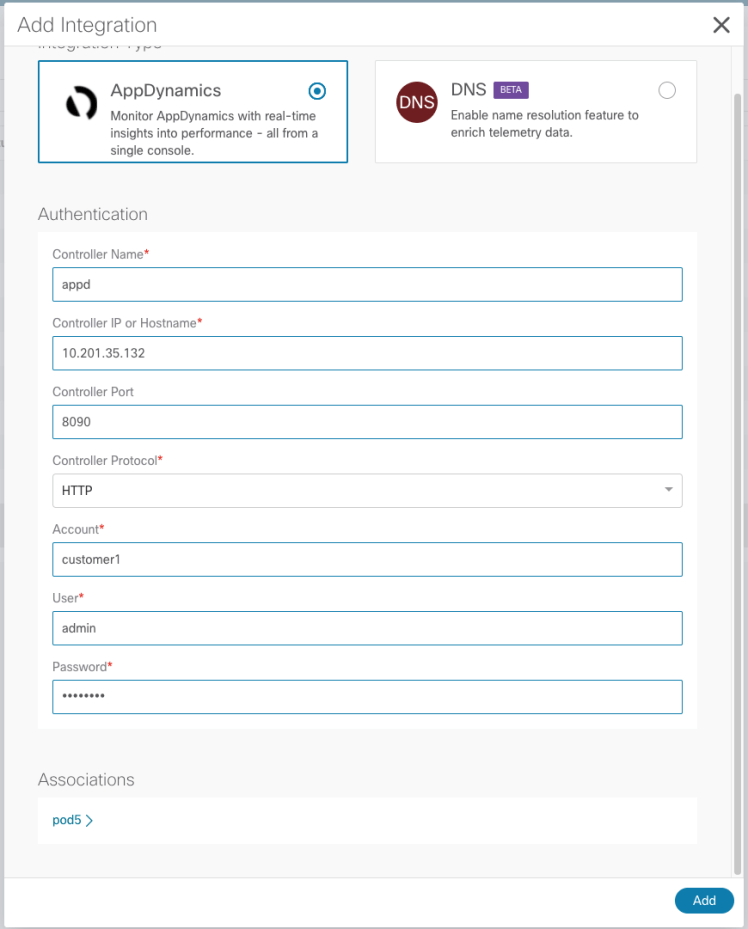
Figure 32: AppDynamcs connection wizard
The account variable can be found by navigating to the AppD controller then to the gear icon for Settings -> License -> Account.

Figure 33: Finding the account variable in AppD Controller GUI
Go ahead and submit the configuration in the NDI app. If everything goes as planned you will see the integration is active.

Figure 34: Viewing active integration in NDI GUI
We can see the Application from the NDI GUI now as well.

Figure 35: Newly visible Applications tab in NDI GUI
Clicking the Applications sub tab bring us to view the configure AppD monitored app.

Figure 36: Our AppD app in the NDI GUI
This concludes the installation and integration of AppD and NDI. In later articles we will be looking at installing Appdynamics Machine Agents, DB Agent, and Network Visibility Agent. After installing those agents we will look at the Kubernetes agents and connecting those Apps to Cisco ACI.
References:
Planning your Deployment:
https://docs.appdynamics.com/21.4/en/application-performance-monitoring-platform/planning-your-deployment/platform-requirements
Enterprise Console:
https://docs.appdynamics.com/21.4/en/application-performance-monitoring-platform/planning-your-deployment/platform-requirements
AppD Controller:
https://docs.appdynamics.com/21.4/en/application-performance-monitoring-platform/controller-deployment/controller-system-requirements
AppD EUM Server:
https://docs.appdynamics.com/21.4/en/application-performance-monitoring-platform/eum-server-deployment/eum-server-requirements
Sample App:
https://github.com/banago/simple-php-website.git
PHP Agent Versions and Requirements:
https://docs.appdynamics.com/21.4/en/application-monitoring/install-app-server-agents/php-agent/php-supported-environments
Hi, thanks for your detailed demo.
Do you know if this AppD and NDI integration keeps being developed by Cisco BU? I think this integration is still valid far now, but I think there is no new feature related to this AppD Integration in NDI.
It is not being developed further. The new observability Platform COP will integrate with in the future, but is still being developed.