Jenkins is an open-source Continuous Integration server written in Java. With Jenkins you can send configurations to devices using Ansible/Terraform/Bash/Shell/SSH and a variety of other methods / scripts to any device. Jenkins is very commonly used by developers for creating/testing/deploying code and is an integral part of Infrastructure As A Code. Jenkins can also orchestrate using Pipelines, which is a chain of code with what/if scenarios. For instance if Code Block #1 fails, then Code Block #2 cannot be executed.
Not Surprisingly Jenkins can be used for automating ACI Configs and from NAE (release 5.1.x) running on ND, Jenkins can send code to ND for Pre-verification. If the Verification is Passed by NAE, then Jenkins gets the results back and sends the code with the configuration to ACI. If the Pre-verification is failed by NAE, then Jenkins will not push the code to ACI. This can be further integrated with Git, so all your code resides in Git and is version controlled. When a change is made and committed/pushed to Git, Git sends a Webhook message to Jenkins ( or Jenkins can be configured to poll Git (using SCM (Source Code Management)messages) on a cron schedule to find out if anything changed. If Jenkins sees a change compared to what it has currently, it gets the intended change and initiates a push to NAE for configuration verification and the process above continues.

In this Article, I will first do a video Demo of using Jenkins/Ansible/Git for ACI Orchestration and for NAE Pre-verification. I have built a container based version of Jenkins with all the code I will show. In the video Demo ( about 59 minutes), I will go over the usage and configuration highlights also. All the code will be residing in my Git repo which you can clone and fork for your own use. If this is of further interest to you after watching the Video, please feel free to follow the instructions and download my repo and have your own version of Jenkins with all the Ansible Code that I will show in the demo for you to use and get familiar with. You can then be on your way to add more code as per your needs.
For whatever reason, it seems that youtube videos are much more crisp than videos uploaded here. You can watch this in youtube at: https://youtu.be/qvA7GfR3F4M
Instructions for setting up your own Jenkins Server with all the ACI code (shown in demo) pre-configured.
First you will need to bring up an Ubuntu VM (preferably Bionic 18.04). You can also do this in the cloud if you wanted to.
Next, Install docker and docker-compose following the below steps:ssh to your Ubuntu VMsudo -iapt-get update && apt-get upgrade -yecho net.ipv4.ip_forward=1 >> /etc/sysctl.confsysctl -pexit # twice, to completely get out, then ssh back insudo apt install docker.io -ysudo systemctl start dockersudo systemctl enable dockersudo groupadd dockersudo usermod -aG docker $USERexit # and ssh back in for this to workdocker --versionsudo apt install docker-compose -y
Now you are ready to bring up the Jenkins Container
Step 1:
in your home directory, make a folder called jenkinsACI and cd to it:
mkdir jenkinsACI && cd jenkinsACI

Step 2:
Clone the below git repo (on your ubuntu vm):
git clone https://github.com/soumukhe/jenkins-aci-docker-compose.git
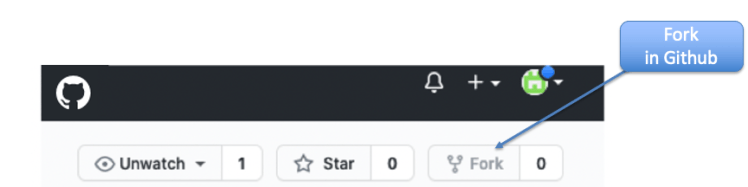
browse to each of the following repos and fork them to your repo:
https://github.com/soumukhe/jenkins-NAE-cicd-
https://github.com/soumukhe/jenkinsWebhook
https://github.com/soumukhe/jenkinsSCM
Step 3:
Clone the below forked git repos
First Set a variable for gituser  with your git account username:
export gituser=<your_github_userName>   #  e.g.  export gituser=carlos
Now, clone those forked directories (on your ubuntu vm):
git clone https://github.com/$gituser/jenkins-NAE-cicd-.git
git clone https://github.com/$gituser/jenkinsWebhook.git
git clone https://github.com/$gituser/jenkinsSCM.git
Step 4:
cd jenkins-aci-docker-compose
./createCerts.sh

Now, create a local user in your APICs with name of ansible. Install the contents of the X.509 Certificate for user ansible. Please make sure to name your certificate “ansible” in APIC as this is what I put as the value in Jenkins for the key name.

Step 5:
vi Jenkins-aci-docker-compose
change extra_hosts in docker-compose.yaml accordingly:
also, change the port number, you want to map the jenkins app to in your host

Step 6:
cd myJenkinsData/Ansible/APIC/
vi hosts
change the name of the apics to the ones you gave in the above step

Step 7:
Build the Jenkins container (needs to be done from “Jenkins-aci-docker-compose” folder
cd   ../../../
docker-compose up --build -d
You are all done installing
Check with “docker ps”

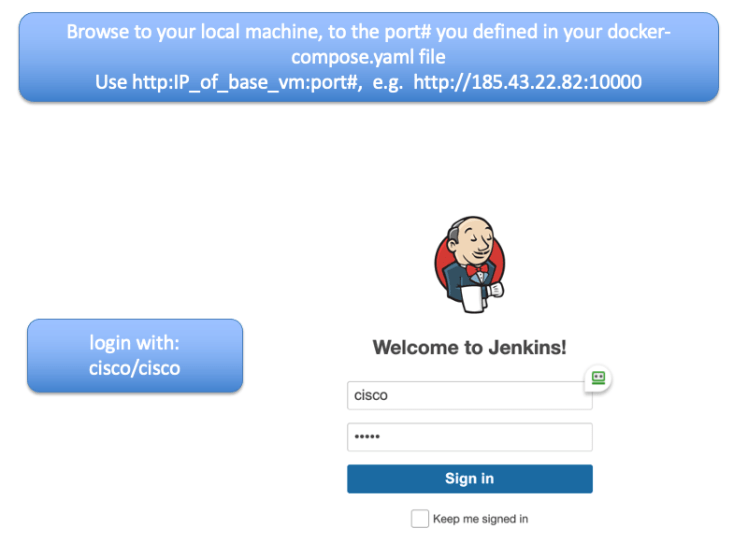
Now Browse to the base VM with port number that you defined in your yaml file (and viewed from docker ps). The password is cisco/cisco
Let’s go and make one quick configuration change.
On Jenkins UI, click on Manage Jenkins

Now Click on System Configuration

Change the Jenkins Location to the correct URL: http://your_base_machine_IP:port/

Now browse to Manage Jenkins / Manage Credentials and replace the private key contents with the contents of remote-key for remote_user

In case you see anoter remote_user credentials at bottom, just delete it

Hit Replace to replace the Private Key.

Copy and paste the contetns of the remote-key there

Now go to Manage Jenkins / Configure system section. Scroll down the page to the SSH section. There you will need to tie in the remote_user with the ssh key for remote_user. Make sure to hit the “Check Connection” button, to make sure it’s all good.

Now, we need to change the Project “NAE-PVC-DeclaritivePipeline” script to customize it for your environment. Click on the project and then click on Configure

Replace “soumukhe” with your git username for GitHub Project. do the same for the Pipeline Repository. Make a note that the Pipeline Repository ends in .git whereas the GitHub Project is just the URL with no git.

If needed change the GitHub hook trigger to Poll SCM

Below is an explanation for Poll SCM and Github hook trigger (webhook)
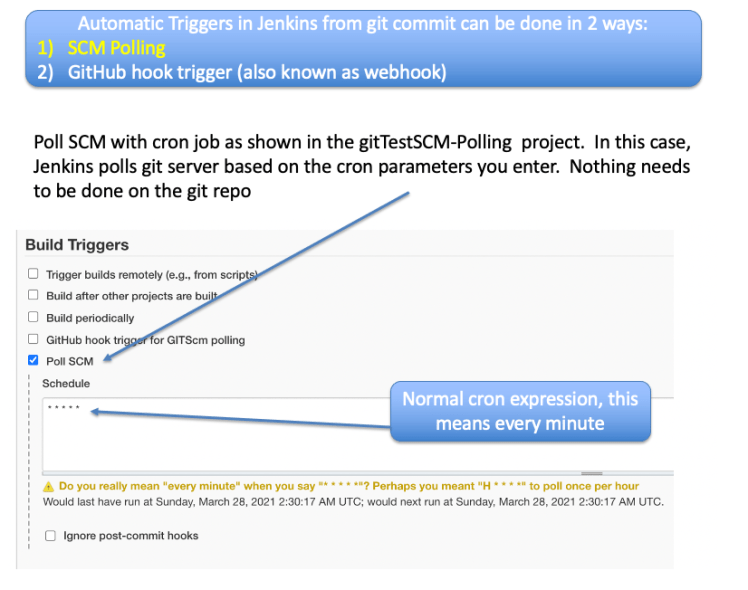

In case of Github hook trigger, you will need to configure github repo accordingly as shown below:


Few more items need to be done, to modify the Pipeline script to work based on your repo:
on your Ubuntu base VM, cd to the “jenkins-NAE-cicd-” directory
vi jenkinsFile-pipelineScript.groovy
change the url location. Change “soumukhe” to your git username

Also, change the “Jenkins-NAE-cicd-/ACI/nae_pvc.yaml” file with information on your NAE.
Change the name of the ag_name based on your site name as shown in NAE

Remember that you need to turn off schedular in NAE when doing a pre-analysis

Location of Ansible Scripts:
They are on your base machine and are mapped to the Jenkins Container.
Look at:
jenkins-aci-docker-compose/myJenkinsData/Ansible/APIC
You can now start using/modifying/creating your own jobs. Please view the video
Kinds of Jenkin Pipelines:
a) Step
b) Stage
c) Node
d) Pipeline (declarative)

Syntax Comparision between Declarative Pipeline and Scripted Pipeline in Jenkins

very good tutorial, structured, well explained, it just works!
Thank You Mihai !