When adding Cloud Accounts to the Cloud ACI Fabric, you have few choices. Keep in mind that the physical ACI fabric is not relevant here. It may or may not exist as part of your ACI Cloud Fabric. In fact you do not even need a physical ACI Fabric to set up Cloud ACI. This is a very valid use case for Enterprises who need to do B2B connectivity between different partners/subsidiaries. Consider the case where an enterprise like a manufacturer has developers who work on AWS cloud and they need to collaborate with their suppliers whose developers work on Azure cloud. Setting up an ACI fabric and creating tenants between AZure and AWS gives you the ability to have a single pane of management/security/policy domain between the Tenant in AWS and Azure clouds.
The AWS method for Adding Tenants:
- For ACI Fabric in AWS, each ACI Fabric Tenant needs a separate AWS account.
- ACI Infra Tenant will need an AWS account. After that every Tenant that you spin up will need a separate AWS account. Ofcourse inside a Tenant you can still do separation with multiple VRFs. In that way, AWS is already ready for B2B connectivity if needed.
- When adding new AWS accounts to the ACI Fabric (for the purpose of creating a new ACI Cloud Tenant), you ave 2 choices.
-
AWS Non-Trust Tenant (aka untrust): Associate ACI tenant to AWS account using AWS Access Key ID and Access Key Secret
- AWS Trusted Tenant: Associate ACI tenant to AWS account by running IAM policy with Cloud Formation template on second AWS user account
-
The first Option is a quick way of adding a new AWS tenant to the ACI Fabric but it’s for more of a temporary POC type of setup.
The second option is a more permanent option that should be used for a production setup.
The Azure Method of Adding ACI Tenants:
In Azure the same Azure Subscription ID can be used for Multiple ACI Fabric Tenants. This means that if you wanted to, you could build the infra Tenant on one Azure Subscription and then build more user Tenants in the same subscription.
Azure’s has a Active Directory structure. The top level structure is the organization, under which it has directories (also known as a Azure Tenant). Inside the Directories you can have one more Azure Subscriptions.
ACI Tenants (one or more) are tied to Azure subscriptions. The subscriptions used for Tenants, could be:
- The same subscription
- Different subscriptions in the same directory
- Different subscriptions in different directories of the same organization
- Different subscriptions in totally different organizations
In this post I will show you how to use each of these methods
Let’s take the AWS case first.
The figure below shows the options for adding AWS accounts to the Cloud Fabric. This is done on the MSO.
(I’m showing this screenshot first so you can see what is needed from MSO while creating an untrusted AWS account. Note that you first need to go to the tenant account and follow those steps first before coming to MSO and entering the values)
- Untrusted: the quick and temporary way– for this you need AWS Account ID, Cloud Access Key ID and Cloud Secret Access Key ID
- Trusted: The permanent production way. Once setup is done you only need the AWS account ID.

How to Setup AWS Untrusted Account:
Do this on the Tenant account.
Step 1: Create a user group in AWS IAM (Identity and Access Management).

Give the user Administrative privileges

Step 2: Create a user and put the user in that group. the page after that is for adding tags which is optional. You can go to that page and skip to the following page if you want.

Give the user Programmatic Access only

Review the summary and then Click on “Create User”

Copy the Access key Id and Secret Key ID for that user to a text file for safe keeping

Now on MSO create the AWS Tenant

You now have all the information you need

How to Setup AWS Trusted Account:
Step1: Go to MSO and add Tenant. Select AWS Associated Site.

Select the Trusted option. Add AWS Account ID.

Step 2: Go to cAPIC and Slect Tenant and double click on the tenant you created. Then click on the link that it tells you to use to run the required AWS Cloud Fomration template

AWS console will open up. click next
( 7/10/2020 — * Note: before you click on the link “Run the cloud Formation Template” in figure 12″, please make sure that the browser does not have a tab opened for the Infra Account. If it does then the Infra account will open up for the CFT run and you don’t want that. You want to run the CFT in the Tenant account. It’s easiest to first make sure that you don’t have any infra Account AWS tab opened on that same browser that you are using for cAPIC . Then in the same browser log into the Tenant AWS account. After that click on the link shown in figure 12. Alternatively you can copy the link and paste it on a different browser (if using firefox for cAPIC, and you have infra tenant AWS console open in that browser, then open up AWS Tenant account in Chrome and paste that link in that Chrome browser — Thank You to Ramki from Dell for pointing this out)

Enter some name for the Cloud Formation Stack and click Next

Click Next Again.

Acknowledge and Continue

The status will show “create in progress”

The status will finally change to “CREATE_COMPLETE”

You are all done. Now cAPIC will know that it’s a trusted AWS Account. You can now start building your ACI Fabric Cloud tenants

Let’s take the Azure case now.
The figure below shows the options for adding Azure accounts to the Cloud Fabric.
- Select Shared: This can be used when you have already associated Azure Subscriptions with either of the above 2 methods and want to create more tenants in that subscription.
- Create Your Own Managed Identity: This can be used when the Azure subscriptions are in the same directory (of the same organization)
- Create Your Own Unmanaged Identity (a.k.a. Service Principle): This can be used when you have want to make Tenants in different subscriptions . The subscriptions are either in different Azure directories (Azure tenants) in same organization. or the subscriptions are in totally different organizations.,


Shared Identity:
At this point the assumption is that the Cloud Fabric is already stood up.
Just go to MSO, make a new Tenant, Associate the Azure Site.

Now choose any of the existing ACI Cloud Tenants you already made in any of the associated Azure subscriptions and then create a new ACI Clopud Tenant there. This could very well be the same subscription that is running the Infra ACI Cloud Tenant

Create Own – Managed Identity:
For this the different Azure subscriptions need to be in the same Azure Directory (also known as same Azure Tenant).
If your Azure Subscriptions are in different directories and you want to use this method, you can go to the Azure console and click on each of the subscriptions and move the subscriptions under the same Azure Directory. You can only do this if the directories (containing the different subscriptions are a child of the same parent organization.

In the example below, I show that I had 3 different Azure directories under the same parent directory and then after moving they came under one directory.

Now go to your Tenant Subscription Account and there go to Home/Subscriptions/IAM/Add Role Assignment. Then choose the following:
- Role: Contributor
- Assign Access To: Virtual Machine
- Subscription: choose the Subscription ID where your Azure cAPIC is installed (infra Tenant).
- Select the cAPIC VM and click assign. The cAPIC will show up in that Tenant Subscription becuase the Infra Account is in the same Azure directory as the Tenant account (in this case)

Please repeat the above process and also add a similar kind of role for cAPIC VM but as Network Contributer
Once done the “Role Assignments”. should look like below:

Now go to MSO and add Tenant, choose the AZure Site., click edit

Choose Create Own, Managed Identity and put in the Subscription Id of the Azure account where ACI Tenant will go (the one you were working on)

You are all done. You can now start using this Azure Subscription for your ACI Cloud Tenant
Create Own – Unmanaged Identity:
This is the last option to discuss.
Note: Unmanaged Identity actually means Service Principal in Azure Terms. From cAPIC 5.2 the name Unmanaged Identity has been changed to Service Principal.
This method would be useful for B2B connectivity where you have to extend the ACI Tenant to a totally different Azure account (either in a different directory in your organization or a totally different organization or even your own personal Azure account).
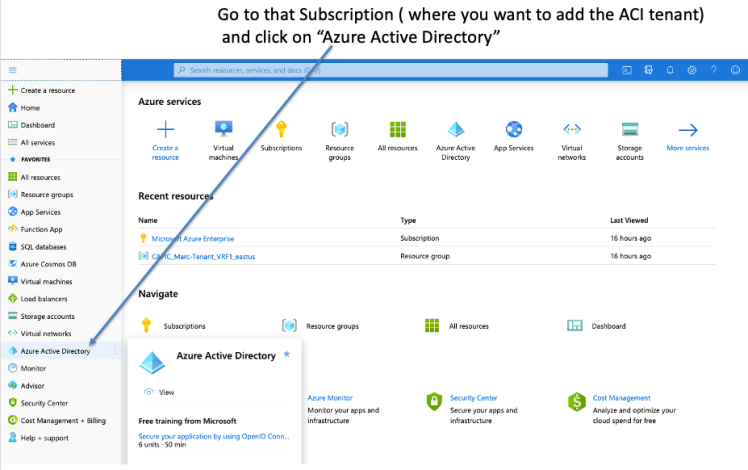
For this go to the the Azure Subscription where you want to add the ACI tenant. Click on Azure Active Direcory
Click on App registrations and then Register a new app

Create the appropriate account type, the bottom one being the least restrictive

Next, click on Certificates and Secrets

Click on New client secret

Choose the validity period for the certificate

Copy the secret to a text file for safe keeping

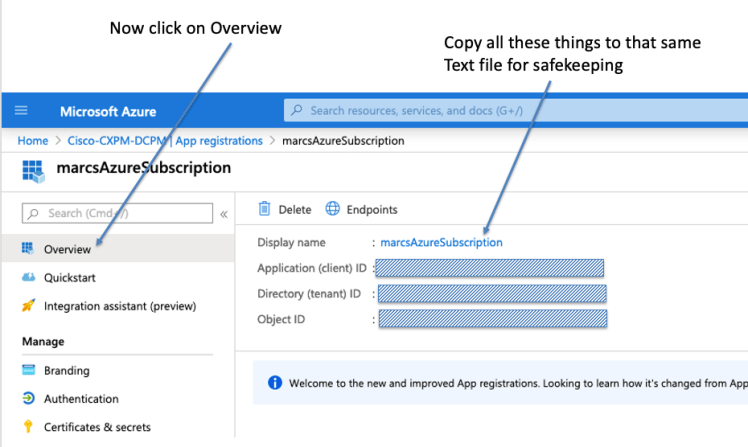
Click on overview and add the information to the same text file for safe keeping.
- Application (client) ID
- Directory (tenant) ID
- Object ID
Now Go to MSO and add Tenant. I like to give a long name for this Tenant. I don’t want folks to use this Tenant to build the schemas/templates, etc, etc. I like to keep this as a place holder, to keep that Azure account associated. The reason for the long name is that the total of Tenant Name and Schema name has a limit of 31 characters and I like to sort of max this limit out with the Tenant Name itself, so folks can’t create a schema under it.

Choose:
- Create Own
- Unmanaged identity
- Put in the Subscription ID for the Tenant
- Paste the following from the text file you saved:
- Application ID
- Client Secret
- Directory ID

Click Save on main page

Now, go to cAPIC for Azure and click on applicant Management/Tenant, and double click on the Tenant you created. Copy the command string you need to execute on the tenant subscription account bash terminal to a text file.

Now go back to the Azure Subscription ( the tenant one) and click on the bash prompt on blue bar

Once the bash prompt opens up, paste in the command string and hit enter

If you checked in the Azure subscription (of tenant subscription), you will see that object show up there nowunder Subscriptions/IAM/Role Assignments

On cAPIC for the Tenant, you will see that there are no more fuaults

If you see that you still have some faults that have not cleared please click on Event Analytics and look at the details of the fault. It will clearly show you what additional role you need to assign to the Tenant Subscription and what command to use. Copy that command and execute again on the bash shell on Tenant Account.
Now create your first Cloud ACI Tenant on that Azure Subscription

Select Shared and that Subscription account will be now seen as a choice. Choose it.

To test it out quickly, create a shcema/template for that tenant. You only need to build a VRF,AP,EPG for testing

Now go the the Azure Subscription for the Cloud ACI tenant and you will see that under Resource Groups the new resources have popped up there.
That verifies that everything is now working on that foreign Subscription

References:
- Cisco Cloud ACI on AWS White Paper
- Cisco Cloud ACI on Microsoft Azure White Paper
- Internet Service for Cisco Cloud APIC Workloads: (how to create untrusted user)
- Cisco Cloud APIC for AWS Installation Guide, Release 4.2(x)
- Shared On-Premises L3Out for Cisco Cloud APIC Workloads
- Cloud APIC Install Guide-Azure
- Cisco Cloud on Azure White Paper
- Cloud APIC Insall / Upgrade & Configure Guide