Having a standby APIC is very useful in case of APIC failure, so you can promote the standby to take over the failed APIC.
The benefits of having standby APIC is that during upgrade, the standby APIC upgrades automatically, so you always have a standby APIC in the correct version ready to go.
One overlooked feature of standby APIC is that it can be used to replace a APIC or move an APIC to a different location. For instance in a ACI Multipod Fabric, you can move a APIC easily from POD1 to POD2 using this method. Or, maybe you are about to upgrade your APIC from APIC-L2 to APIC-L3 (or APIC-M3). Using a standby APIC makes this really easy.
In this example I show a multipod fabric with 2 PODs. APIC1 and APIC2 are in POD1 and APIC3 is in POD2. I want to move APIC 2 from POD1 to POD2. I will setup a standyb APIC in POD2 and then switch over so that APIC2 is removed and the standby APIC now assumes APIC2 role and at the same time is moved to POD2.

Before Switchover, let’s take a look at the APIC GUI to see what the APICs currently look like. This is shown below.

Let’s verify that all the APICs are synced up and “Fully Fit”

Let’s also click on Standby APIC tab to see if I have any standby apic currently

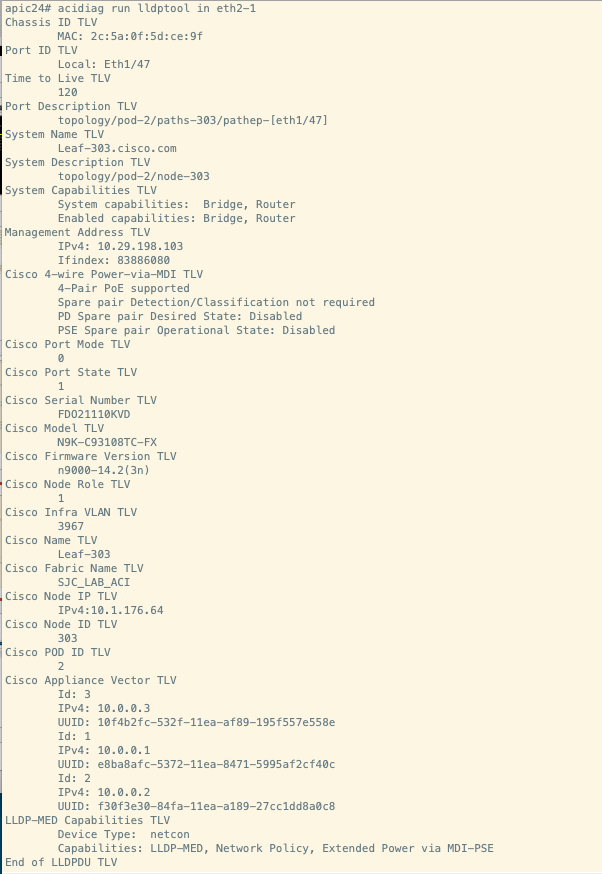
Since I don’t have any standby APIC, I will install one in POD2 and connect the uplinks (eth2-1 and eth2-2) to a pair of leaves in POD2 as shown in Figure 1.
A Quick Note on APIC M3/L3:
On APIC M3/L3 the default configuration from CIMC comes with hardware port Channel enabled. Remember that the APIC does a active/standby bonding on the 2 uplinks to the leaves. If you use eth2-1 and eth2-2 with this default configuration, your APIC’s LLDP neighborship will get really hosed and your APIC will never join the fabric. You could either connect eth2-1 and eth2-3 or eth2-2 and eth2-4 to overcome this. What I prefer doing is to go to CIMC and turn the default hardware Port Channel off. Then I use eth2-1 and eth2-2 and everything is fine. To do this go to CIMC of your APIC M3/L3, click on Networking/Adapter Card1, and then turn off Port Channel and save the config as shown in the diagrams below. ( a reboot of the host will be required for this to take effect).

First, gather all information for the APIC cluster setup so we know what to put in the standby APIC initial setup. You can do this via GUI or from CLI on APIC.
GUI Method:

CLI Method (ssh to any apic):
cat /data/data_admin/sam_exported.config

Second, I would suggest to upgrade the APIC manually to the current version that you are running in production, without connecting it to the fabric. This can be easily done through GUI or manually. After the upgrade connect up the uplinks to a pair of leaves.
Third, go in through CIMC console and setup the standby APIC. Use the information gathered above to populate the startup wizard. Also make sure of the following.
- put the correct POD ID where the APIC will be moved
- make sure you select “standby”
- make sure to name the apic with the name that the new apic will have


After a few minutes ping the OOB IP to make sure that it’s reachable

From the console you will see that standby apic is on login screen

You will need to login as rescue-user with no password if you want to look around. (admin password will not work)

You could also ssh in as “rescue-user” using the oob IP of standby APIC
Some Basic commands will work from here. Some are shown below.

APIC GUI should now show the standby APIC with the serial number

On GUI go to APIC/Cluster as seen by Node and click on “Standby APIC”

You will now see the new Standby APIC there

Now, let’s replace APIC 2 with the standby.
From GUI:
- first make sure that you go to any other APIC other than the one you are replacing.
- Click on Cluster as seen by Node
- Click on the APIC you want to replace and click the right mouse button and click Replace

The Default is to Retain OOB IP for Standby

From GUI you will see that the old APIC2 is now unavailable and is in “reprovisioning” state

The Original APIC will be automatically shutdown

You will also notice that Standby APIC is gone now

The original APIC will then show Unregistered and waiting for new APIC

On the Console of Standby APIC you will notice that the Standby APIC will reboot

On the GUI you will see that the APIC has now come in and is syncing the database

In a few minutes, it should be done. You will notice that the APIC ID is now the same as the original APIC that you replaced

You can check the IP and see that it’s retained the new Standby APIC IP

You are all done !!!
Make sure to disconnect the old APIC. SSH to it and clean it up with the following commands:
- acidiag touch clean
- acidiag touch setup
- acidiag reboot
Conclusion:
- The Process is really simple and quite fast.
- Though you could easily do this without maintenance window, it’s better to do it during a maintenance window
excellent explanation
Thank You Roman. I spend a lot of effort and time in writing these articles. Your comment makes it all worth while !
Very nice article and straight to the point.
Thank You so much for the great feedback ! I spend a lot of my own time writing these articles and this sort of feedback makes it worth my time and effort.
Please continue with these great articles
Thank You so much Stijn ! I really appreciate your feedback and knowing that these are helping the community gives me incentive to keep going !
Can you have more than 1 standby APIC at a time?
Yes, absolutely. I’m not sure there is an upper limit. I have done 3 standby APICs for customers, and had once done 4 in my lab.
Thanks, I ended up pulling all 3 new APICs in as standby and replaced the existing APICS one by one. Worked like a charm!
Awesome !!! You are the expert !!!
Hi, very good article thank you ! I have a question, you say that we can use this method to replace L2 by L3. I can’t find any official doc saying we canhave L2 APIC and L3 APIC in a same cluster. Could you assure me (or give me a doc) that I can have L2 and L3 in same cluster ? I have a need to replace 3 L2 APIC by 3 L3 APIC and I would like to use the method you give, one by one.
Hi
Pretty Late here, But may help new readers,
Here is an document mentioning you may mix different APIC models in a Cluster.
https://www.cisco.com/c/en/us/td/docs/dcn/whitepapers/cisco-application-centric-infrastructure-design-guide.html
&
Replacing Old L2/M2 with new L3/M3
https://www.cisco.com/c/en/us/td/docs/dcn/whitepapers/cisco-apic-m1-m2-m3-migration-guide.pdf
Thank you for your comments. Please bring up the standby in the new pod. See figure 7.
Thaaaanks keep up the good work
Thank You Alejandro
Very nice articial . I have a question what if we have a standby APIC in POD2 and we would like to move it to POD3 ? How do we change POD #?
Thank you for your comments. Please bring up the standby in the new pod. See figure 7.